PokéPath TD 1.3 Best Farm Team Guide — Maximize Your Gold Earnings
Hi everyone, this is POKEPATH.IO. With the release of version 1.3, many new items have been added to PokéPath TD, significantly strengthening various Pokémon and changing farming strategies. Many players struggle with gold shortages, so we've compiled this comprehensive farming guide to help you understand when to start farming, the different farming stages, and the best team compositions for maximum gold earnings.
Table of Contents
When to Start Farming
You can start considering farming once you meet these two conditions:
- Reach Wave 100 of Route 1-2 (ZAPDOS) — IMPORTANT: Do NOT defeat ZAPDOS! Keep it alive to continue farming.
- Unlock PERSIAN and DITTO — These two Pokémon are essential for your farming team.
Farming Stages
There are two main farming stages in PokéPath TD, each serving a different purpose in your progression:
Stage 1: Farm ZAPDOS (Route 1-2)
ZAPDOS is your first farming target because:
- Early Access — ZAPDOS is unlocked earlier in the game progression
- Good Value — Worth 38,908 gold per kill, which is excellent for starting your farming journey
- Quick Start — Allows you to begin accumulating gold earlier to upgrade your Pokémon
Stage 2: Farm MOLTRES (Route 1-3) — The Ultimate Farming Spot
MOLTRES is the best farming location in the game:
- Optimal Terrain — Route 1-3's map layout is perfectly designed for farming efficiency
- Highest Value — Worth 58,158 gold per kill, significantly more than ZAPDOS
- Endgame Farming — You can farm MOLTRES continuously until all your Pokémon reach Level 100!
Farming Progression Summary
ZAPDOS (38,908g) → Early farming to build your team → MOLTRES (58,158g) → Farm until all Pokémon are Level 100
Best Farm Team Composition
We provide two optimized farming teams: one for Route 1-2 (ZAPDOS) and one for Route 1-3 (MOLTRES). Each team includes recommended items for every Pokémon and the expected gold per minute (GPM) rate.
📋 Items Reference
If you're unfamiliar with these items' effects, check out our Items Meta. It lists all item effects, recommended Pokémon for each item, and usage restrictions.
Team 1: ZAPDOS Farm (Route 1-2)
Gold Per Minute: 0.9M GPM (900,000 gold/minute)

Team Roster & Recommended Items
- PERSIAN + DITTO (copying PERSIAN) — Your main gold farming core
- Role: Maximize gold drops from ZAPDOS
- PERSIAN Item: Quick Claw

- DITTO Item: Quick Powder

- CORSOLA — AOE slow support
- Role: Slow down enemies to keep them in PERSIAN's range
- CRITICAL PLACEMENT: Must be placed exactly as shown in the image! If placed in the bottom-left corner, it will slow ZAPDOS too early, reducing farming efficiency. Similarly, don't slow ZAPDOS after it leaves PERSIAN's range. Keep the slow zone aligned with PERSIAN's gold farming range.
- Recommended Item: Light Clay

- COMFEY — Attack speed buffer
- Role: Buff AMPHAROS and SMEARGLE's attack speed
- Recommended Item: None required
- AMPHAROS — Stun control
- Role: Stun ZAPDOS to keep it in farming position
- Recommended Item: Air Balloon

- SMEARGLE — Shiny effect applicator
- Role: Apply shiny effects to Pokémon for additional bonuses
- Recommended Item: Adrenaline Orb

- SHUCKLE — Primary slow support
- Role: Main slow control to maximize farming time
- Recommended Item: Berry Juice

Key Strategy Notes
- CORSOLA's placement is CRITICAL — follow the image exactly
- Keep ZAPDOS within PERSIAN's range at all times
- Coordinate slow effects to maintain optimal farming position
Team 2: MOLTRES Farm (Route 1-3) — Ultimate Farming Team
Gold Per Minute: 2M GPM (2,000,000 gold/minute)
This is more than DOUBLE the ZAPDOS farm rate! If you're unfamiliar with these items' effects, check out our Items Meta.
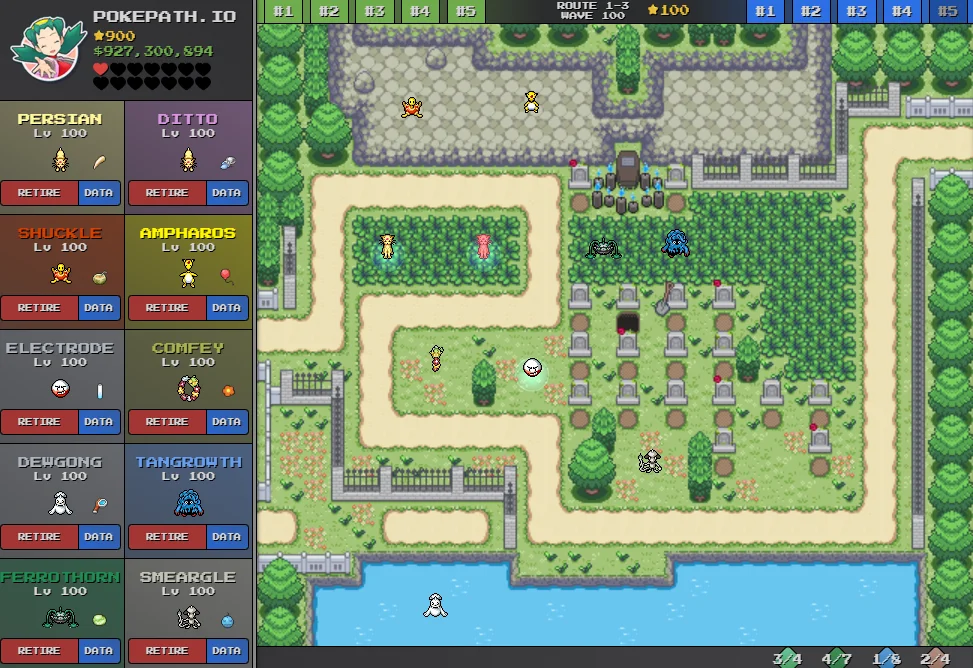
Team Roster & Recommended Items
- PERSIAN + DITTO (copying PERSIAN) — Your main gold farming core
- Role: Maximize gold drops from MOLTRES
- PERSIAN Item: Quick Claw
- DITTO Item: Quick Powder
- COMFEY — Attack speed buffer
- Role: Buff PERSIAN, DITTO, and ELECTRODE's attack speed
- Recommended Item: Revelation Aroma

- AMPHAROS — Stun control
- Role: Stun MOLTRES to keep it in farming position
- Recommended Item: Air Balloon
- DEWGONG — Stun support
- Role: Additional stun control for MOLTRES
- Recommended Item: Wide Lens

- ELECTRODE — Stun support
- Role: Additional stun control for MOLTRES
- Recommended Item: Cell Battery

- SMEARGLE — Shiny effect applicator
- Role: Apply shiny effects to Pokémon for additional bonuses
- Recommended Item: Adrenaline Orb
- SHUCKLE — Primary slow support
- Role: Main slow control to maximize farming time
- Recommended Item: Berry Juice
- FERROTHORN — Secondary slow support
- Role: Additional slow control
- Recommended Item: Light Clay
- TANGROWTH — Secondary slow support
- Role: Additional slow control
- Recommended Item: None required
FAQ
Q1: Why is CORSOLA not used in the Route 1-3 farm team?
A1: Due to Route 1-3's terrain layout, CORSOLA is not optimal for this setup. The combination of SHUCKLE, FERROTHORN, and TANGROWTH provides better slow coverage for this specific map. The terrain positioning makes these three Pokémon more effective at controlling MOLTRES's movement within PERSIAN's gold farming range.
Q2: When should I start farming? My Pokémon levels are still low.
A2: Please refer to the Farming Stages section above. It explains the progression from ZAPDOS farming (early game) to MOLTRES farming (endgame), and the requirements for each stage.
Q3: How do I enable auto-farming? Why does it only farm one round?
A3: To enable continuous auto-farming, go to the game's Settings and set Auto Set to Retry. This will automatically restart the wave after each completion, allowing you to farm continuously without manual intervention.